Tuesday, August 25, 2015

[Unity 3D] Tutorial 4: Roguelike

It's been almost three weeks since I finished this tutorial and it was about time that I wrote a post about it. It's been a very interesting one, since it introduces procedural generation of levels and tile-based scenes for the first time. With this one we also move from basic to intermediate difficulty.

The project is called Roguelike because its elements are based on "Rogue", a computer game that was released in 1980 and which established a new video game subgenre. Roguelike games are 2D and tile-based, with levels generated procedurally and a turn-based gameplay. Another characteristic is the so called "permadeath", which means that when the character dies the player has to start all over again from the beginning.

Setup
The first part of the tutorial focuses on creating game elements out of the sprite assets so that we can use them later on in our game. We learn to create animations from sprites, which basically consists on dragging the desired sprites from the sprite sheet and dropping them on to the corresponding game object. This will create the animation, an AnimationController and a SpriteRenderer components automatically. One of the important things to set properly when working with sprites is their render order in the scene, so that we can establish which ones will be rendered on the foreground and which ones on the background. This is done by setting the sorting layer attribute on the SpriteRenderer component.

Next we need to create the tile prefabs that will be used in the procedural generation of the levels. This is again very simple, since we just need to create an empty GameObject and add a SpriteRenderer component to it, in which we will set the sprite that we want to use and its sorting layer.

Game logic
The game logic is taken care of mainly by the GameManager script, which is in charge of initializing the scene every time a level is completed and managing the turns. Initialization of a level consists of generating a new board and setting the UI to show the player which level we are going to play next. The GameManager makes sure that neither the enemies nor the player can move until initialization has been completed with the use of boolean flags.

Turn management also makes use of flags to decide whether the enemies or the player can move. It will be the player's turn until the user moves, and then it will be the enemies' turn until all of them have moved. Movement and actions performed by the units are managed by separate scripts (Player and Enemy, which inherit from a common script MovingObject).

Finally, the GameManager takes care of showing the game over message when the player has run out of lifes (in this case, when he has no food left).

New useful commands introduced in the GameManager script are:

  • DontDestroyOnLoad (GameObject): Don't destroy the game object when loading a new scene, which is the default behaviour. This allows to keep track of values such as the score throughout the levels.
  • Invoke ("NameOfMethod", delay): Automatically call a method after the specified delay in seconds has passed.
  • Use of the attribute [HideInInspector] to serialize a variable without it being visible in the inspector
Generation of levels is delegated to the BoardController script through the method SetupScene(int level). The level number will be used to calculate how many enemies will be placed on the board, making the difficulty increase logarithmically.

To understand how the Board works we need to picture it as a grid of N x N positions. The outer ring of this grid won't be usable, which means that the player and the enemies won't be able to walk here. Instead it will be filled with outer wall tiles to visually delimit the playing area, which will therefore have N-1 x N-1 positions. The area inside this ring will be filled with floor tiles.

Next we need to place the Exit tile and fill the board with items. To avoid generating impossible levels we will leave a second outer ring free of obstacles and always place the Exit tile at the top-rightmost position of this ring (see the image below for reference). The area available for placing enemies, walls and food will therefore have N-2 x N-2 tiles.

We will use a list of Vector3 to store the x,y positions available within this N-2 x N-2 grid that we have defined. Then we will place a random number (within specified min and max limits) of walls and food on those tiles, which will be randomly selected from the list. As soon as we place an item on a tile we need to remove it from the list to avoid placing more than one item on the same place. Since we have several sprite variations for each type of element we will also select which sprite to use at random.

In the case of the enemies the process is practically the same, with the only difference that we will always place an exact number of them depending on the current level.

Note that enemies, walls and food elements are being placed at the same position as the floor tiles that we set above. Here is where having set the sorting layers correctly will come in handy.

Highlights of this script are:

  • Using an empty GameObject created programatically to set as parent for all the sprite prefabs instanciated. Doing this will allow us to keep the Hierarchy view clean while running the game.
  • Defining a singleton class by using a static reference to the only instance allowed
  • Use of the attribute [Serializable] as opposed to implementing the interface Serializable in Java

Interaction of units
This part of the code has been implemented in a very smart way. I will try to explain it as clearly as possible.

Players and enemies share the fact that they can move around a delimited area. The best way to deal with this is to implement the code that allows them to move in a common place so that the Player and the Enemy scripts can share it. This place is the abstract class MovingObject from which both scripts inherit.

The MovingObject script takes care of determining whether a unit can or can't move, and to perform a different action depending on the case. A unit won't be able to move when a ray cast from the current position to the final position hits anything in the blocking layer. Enemies, walls, the exit tile and the player are placed on this layer.

When a unit can move, a smooth movement towards the final destination will be performed. This behavior is the same for both the player and the enemies, and so it's implemented as a shared method in the parent class (SmoothMovement). But when the unit can't move, we will want something different to happen whether the unit is an enemy or the player. First of all, the type of object with which each of them can interact differs: the player can only interact with walls by breaking them, while enemies can only attack the player. And secondly, the animation and sound effects that we will show will be different on each case.

The way this is done is by defining an overridable method AttemptMove in MovingObject:

protected virtual void AttemptMove<T>(int xDir, int yDir) where T:Component

This is a template method that will allow the child classes to use it with different types of objects. In the case of Player, the method will be invoked as AttemptMove<Wall>, since we are expecting to collide with a Wall. In the case of the enemies, it will be invoked as AttemptMove<Player> because we are expecting to collide with it. This solves the first part of the problem.

To define what happens when the movement attempt has failed, the Player and the Enemy scripts implement the abstract method OnCantMove. Here is where the animation triggers are set, the sound effects are played and the damage to either the wall or the player is inflicted. This is the method signature on the child classes:

protected override void OnCantMove<T>(T component)

Highlights of these scripts are:
  • Using templates: using the syntax "where T:Class" as opposed to the Java syntax
  • Overriding methods: 
    • Usage of the modifiers "virtual" and "override" as opposed to the annotation @Override in Java
    • Usage of base.Method() as opposed to super() in Java
  • Usage of two different casting methods: 
    • Prefix-casting: MyType var = (MyType) aVar;
      • Throws an InvalidCastException if not allowed
    • As-casting: MyType var = aVar as MyType;
      • Returns null if not allowed
      • Better performance than prefix-casting
  • Finding out that multiplying is more efficient than dividing in C#

Picking up food
The food pick-up is implemented in the Player script on the OnTriggerEnter2D method, which is a Unity core callback called whenever an object enters a trigger collider attached to the current object. Here the tag assigned to each of the objects is used to distinguish whether we have collided with food or soda. Depending on the case, we will increase the food points by a different amount and play different sound effects.

Loading a new level
Collision with the Exit prefab is also detected on the OnTriggerEnter2D callback by using its tag. In this case we will invoke the Restart method after a specific delay with the use of Invoke, just as we did in the GameManager. The method Restart will simply reload the current level as follows:

Application.LoadLevel (Application.loadedLevel);

Now we will use another Unity callback, OnLevelWasLoaded, to update the level number and initialize the new board. We will place its implementation in the GameManager. This method will be called every time a scene is loaded. 

Other scripts
The Wall and the SoundManager scripts won't be discussed here as they are not particularly complicated. I will only mention a new syntax used in the SoundManager because it's new to me:
  • Usage of the syntax "params Class[] elements" as opposed to "Class... elements" in Java to send multiple arguments to a method

Adding mobile controls
Two new features introduced on this tutorial are the possibility to execute different codes depending on the device on which the game is running, and getting input from a touchscreen.

          #if UNITY_EDITOR || UNITY_STANDALONE || UNITY_WEBPLAYER

               //Get input from keyboard as we have done so far

               int horizontal = (int)Input.GetAxisRaw ("Horizontal");
               int vertical = (int)Input.GetAxisRaw ("Vertical");
                    ...

          #else

               //Get input from touchscreen

               if(Input.touchCount > 0) {
                Touch myTouch = Input.touches[0];
                if(myTouch.phase == TouchPhase.Began) {

                //The finger has touched the screen
                //Save the starting position of the stroke
                touchOrigin = myTouch.position;

                } else if(myTouch.phase == TouchPhase.Ended && touchOrigin.x >= 0) {

                 //The finger has lifted off the screen
                //We also check that the touch is inside the bounds of the screen
                Vector2 touchEnd = myTouch.position;
                float x = touchEnd.x - touchOrigin.x;
                float y = touchEnd.y - touchOrigin.y;
                touchOrigin.x = -1;

                 if(Mathf.Abs(x) > Mathf.Abs(y)) {
                 //The touch has been more horizontal than vertical
                 horizontal = x > 0 ? 1 : -1;
                 } else {
                 vertical = y > 0 ? 1 : -1;
                 }
              }
              }

          #endif


If you have reached this point of the post I think you well deserve a break, so now it's time for you to play. Thank you for reading!

THE WEBGL BUILD DOESN'T WORK PROPERLY AT THE MOMENT. MEANWHILE YOU CAN DOWNLOAD THE VERSION FOR PC HERE. SORRY FOR THE INCONVENIENCE!


Final words
I thought that this would be the last game tutorial before my first solo project, but things have changed a bit. The Unity guys have come up with some new training projects, and there's also an updated version of the Survival Shooter for Unity 5.x. that I would like to check. So the good news is that learning opportunities increase and there's going to be a lot more after this :-)

Wednesday, August 5, 2015

DH2015

After the third Unity tutorial I could not continue with the 4th and last one (Roguelike). The reason is that I signed up for a course in development of AR applications for Android that has kept me busy for the whole month of July. I will write a separate post about its contents and what I've learned.

In another turn of events, a few weeks ago I was checking out this year's edition of Digital Heritage. This is an international congress focused on the application of IT to cultural heritage, therefore bringing together professionals and researchers from both fields. The first edition was in Marseille in 2013 and the second edition will be this year in Granada, which is quite fortunate since I live in Spain. There are several workshops and presentations that would be very interesting to attend, specially the ones focusing on interaction in virtual environments and serious games. Networking is also one of the major benefits of going. Therefore I have decided to participate as a volunteer. I sent my application and they have already accepted, so I'm heading to Granada in September :-) I'm sure that it's going to be a very interesting experience no matter what, but hopefully my working shifts will also allow me to attend the events that I'm interested on. So let's hope for the best!


Wednesday, June 17, 2015

[Unity 3D] Tutorial 3: Survival Shooter

This is a top down isometric style game in which you basically need to shoot everything that moves to survive (a.k.a. survival shooter). You impersonate a boy who's dreaming that all of his toys have come to life. This is the last beginner level tutorial and covers the following topics:

  • Use layers to isolate game objects
  • Animations: use and control transitions in model animations, animate GUI objects
  • Ray casting
  • Input.GetAxis vs Input.GetAxisRaw
  • Movement normalization
  • Time.deltaTime
  • Use Lerp to smoothen transitions
  • AI: use NavMesh, bake a navigable area
  • More on GUI components (CanvasGroup, Slider, Image, etc.)
  • Awake method
  • LineRenderer
  • Alternative method for timers: InvokeRepeating

These are the main modifications I made to make it work in Unity 5:

  • Disable the flag "Has Exit Time" so the animations are in sync with the events. This cancels the ongoing animation when there is a transition to another state
    • Open the Animator Controller
    • In the Animator window, select the transition to modify
    • In the Inspector, locate and uncheck the flag
  • Change the LineRenderMaterial to use an Unlit/Color Shader. The LineRenderer renders the lines black under certain shaders.

The export to WebGL in this project is not so good. The scene appears very dark and the textures have some kind of black spots, but it should look like on the image below. I believe this is because of the preview version of the WebGL player, or maybe due to incompatibility of the assets with Unity 5. Anyway the game is playable, so give it a try and let's see how much you can last!


Thursday, June 11, 2015

[Unity 3D] Tutorial 2: Space Shooter

In this second tutorial they teach you to make a very basic top down space shooter. There is a little more scripting than in the first one and involves using more game objects and features. You learn to:
  • Change the resolution of the game
  • Modify and save a layout
  • Import assets from the Unity Asset Store
  • Work with mesh models, textures and materials
  • Use mesh colliders and capsule colliders
  • Instantiate and destroy prefabs
  • Add background music and sound effects 
  • Use tags to identify game objects
  • Work with coroutines
  • Use the yield instruction
  • End a game and reload it
  • Use methods and parameters like Mathf.repeat,Time.time or angularVelocity
  • Differentiate between screen space and viewport space
The tutorial is again very easy to follow, but it has been developed in Unity 4. If you are using Unity 5 then you will need to make a few modifications to make it work:
  • Mesh colliders won't work unless you enable the Convex flag
  • Some static references such as rigidbody have been removed:
    • Unity 4: 
      • rigidbody.AddForce(movement);
    • Unity 5: 
      • RigidBody rigidbody = GetComponent<Rigidbody>();
      • rigidbody.AddForce(movement);
  • The render settings menu has been moved:
    • Unity 4:
      • Edit > Render settings
    • Unity 5:
      • Windows > Lighting
  • The GUIText is no longer accessible from the Create menu. In Unity 5 you need to create an empty game object and then go to Add component > Rendering > GUIText
And that's all I can remember at the moment. I encountered some of these issues already in the first tutorial but I forgot to mention them in the post.

Finally I added a couple of extras to try new things and make it a bit more interesting: a scrolling background and a blinking text. I will explain how to do it at the end of the post in case someone is interested. I could have added more things like parallax or smarter enemies, but I just want to move on to the next tutorial :-)

And here's the result:


Input settings:
- Move with the arrows
- Shoot with the space bar or the left mouse button


How to make a 2D scrolling background

For the background I followed this live trainning session, which shows several ways to do it. I tried the first two and in the end I kept the version that uses the texture offset to create the effect.You just need to create a Quad, assign it the desired texture and add the following script to it:

public class OffsetBackground : MonoBehaviour 
{

public float scrollSpeed;
private Vector2 originalOffset;

void Start ()
{
originalOffset = GetComponent<Renderer> ().sharedMaterial.GetTextureOffset ("_MainTex");
}

void Update () 
{
float offsetY = Mathf.Repeat (Time.time * scrollSpeed, 1);
Vector2 offset = new Vector2 (0, offsetY);
GetComponent<Renderer> ().sharedMaterial.SetTextureOffset ("_MainTex", offset);
}

void OnDisable ()
{
GetComponent<Renderer> ().sharedMaterial.SetTextureOffset ("_MainTex", originalOffset);
}
}


How to make a blinking text

Making a text blink is very simple. You just need to set the text of the GUI element to blank for a few seconds and then back to its original text for a few more seconds, alternatively. In my case I used it for the "Press 'R' to restart" label.

First I created this coroutine:

IEnumerator BlinkRestartText()
{
while(restart)
{
restartText.text = "Press 'R' to restart";
yield return new WaitForSeconds(blinkingRate);

restartText.text = "";
yield return new WaitForSeconds(blinkingRate);
}
}

And then modified the SpawnWaves method as follows:

if(gameOver) 
{
restart = true;
restartText.text = "Press 'R' to restart";
StartCoroutine(BlinkRestartText());
break;
}

That's all. When the game is over the coroutine is launched and runs until the restart flag is set to false. This happens when the player presses R and the game is reloaded (the method Start will be called by Unity). As for the content of the loop, it will first of all set the text in the GUIText object and wait for a few seconds, and then set it to blank and wait for a few more seconds, and so on. The use of the yield instruction ensures that the game won't be paused while waiting, and that the function will continue from the line after the yield after the wait is over.


Tuesday, June 9, 2015

[Unity 3D] Tutorial 1: Roll a ball

Last week I finished the first Unity tutorial. They have a bunch of them on their website for both beginner and intermediate users, and they are really well explained. You can choose between two learning paths: a set of projects with increased difficulty, and a set of lessons sorted by topic. Personally I think it's best to start with the projects and check the topics as you need them.

In the first tutorial you get to learn the very basics of Unity:

  • Create a scene
  • Add game objects to a scene and enable/disable them as needed
  • Use scripts to define behaviors
  • Convert a game object into a prefab that you can reuse
  • Read keyboard inputs
  • Create a camera that follows the player
  • Basics of physics and collision management, and some hints for its optimization (Rigidbody, static and dynamic colliders)
  • How to display text
  • How to export a game

Here's my version exported as WebGL:


Wednesday, June 3, 2015

Focusing

After doing some research I have come to the conclusion that I want to be a serious games developer. That is, games whose primary goal is not to entertain, but to serve as a training or a teaching tool, to help marketing, etc. This doesn't mean though that these kind of games cannot be entertaining. In fact I believe that they should be, so they can better achieve their goal (specially if their aim is to be educational).

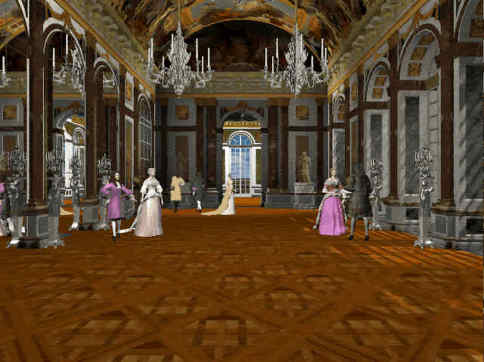
This being said, my focus of interest is still archaeology and history. The kind of games that I would like to make would use historically rigorous models, real stories and characters, and would be educational. I recall a game that I played during childhood and illustrates quite well what I have in mind. It's called "Versailles 1685" and I remember finding it very interesting at the time. What I liked about it is that it takes place in Versailles palace and you get to walk around its different rooms and areas, view and read about its paintings, meet many historical characters and learn about them and about life in the palace. Here some images of the game:


So now it's easier to know what I need to learn. I searched for job offers in serious games and game development in general, and the key skills that I will need are C++ and Unity 3D. Besides this, most of the offers require professional experience in game development, with at least one published game, and about half of them require to have a master in game development. Therefore I've been considering signing up for one of the two main masters in video game development that exist in Barcelona:
From the one taught by UPC I like that it's cheaper and as a UPC Alumni Premium member I get an additional discount :-D Also they use game engines, which would be useful to learn (I guess), and the master has for some reason more visibility among companies. The annual event in which students present their works is always full of people.

The one by UPF is more hardcore. They don't use any game engines and instead expect you to implement your own. I see it as a great learning experience. Another good thing about it is that they split the contents into two independent specializations: design and programming. That means that programmers can focus on just programming and skip the modelling and animation part. Finally, the amount of classroom hours is higher.

I was almost convinced by the one at UPF but a conversation with my boyfriend and several other friends who are professional game programmers walked me out of it. In their opinion masters are too expensive for the benefit they provide, and game companies don't care much about the education section after all. Companies value experience and motivation. Since I'm already a developer they believe that I can learn the same or more on my own. So their piece of advice is that I keep my money and start making copies of simple games or join an indie group. I just need to have a few small projects in my portfolio, know the main concepts in game development and be well versed in the language. And if they all agree on that then I guess they're right.

Next stop: becoming an indie game developer.

Thursday, May 7, 2015

Back in business

Hello again!

It's been more than one year since my first post and it may look like I have lost all my motivation THAT fast. Fortunately that's not the case, I just didn't have anything to write about in relation to 3D or Virtual Reality (not that I can write much about it today either, but today is a big day). But first things first, what have I been up to this whole year?

After quitting my job in February I had lots of time but no money. I had planned to attend the Italian Virtual Heritage School 2014 in summer, a 10-day long program organized by V-Must (Virtual Museum Transnational Network) in which I would learn the basics of virtual archaeology in a practical way: laser scanning, use of drones, photogrammetry, GIS, 3D modelling and so on. So I decided to look for a temporal job until the school started, and so in March I was already working at a new consulting company. It was more or less the same as my previous job (Java programming) but completely different at the same time. Smaller company, realistic timings for projects (no overtime!), great people (not that there were no great people at my previous job as well, but here every single one of them was awesome!), more innovative (thanks to my project leader!), and a more relaxed environment in general. Another difference is that it wasn't application maintenance, but a whole new project starting from scratch. This allowed me to learn things properly, and for that I am very grateful.

In May I received devastating news. The Italian Virtual Heritage School had been cancelled due to lack of attendants, but it might be postponed until October. There was still a chance. Several months passed and there were no news of the school ever starting, so fearing the worst I started looking for alternatives. The school never took place indeed, but I found an online Master program starting in November that was focused on Virtual Archaeology and Preservation of Cultural Heritage. It seemed to fit my needs and so I decided to sign up, but November came and there were no news again. I started to get really frustrated, like I would never be able to achieve what I wanted. I was being so unlucky! I must confess that the lack of news along with other aspects around this Master made me have serious doubts about it being a serious program, and I was considering giving up. Meanwhile I was still working at my temporal job and was feeling very comfortable and happy with it. I also took a course in Android development in November-December and I am now a certified developer, so I had new worlds to explore. But finally the news came and I knew that the Master would start in January.

January to March 2015 have been very busy. I tried to combine work with the Master, but the workload of my studies was too heavy to continue with both, so very sadly I had to quit my job in March. In April my boyfriend and I had decided to go on a trip to Japan, and we have spent the last 4 weeks there (amazing trip BTW). And I just came back 4 days ago, ready to take over the Master.

The last few days have been quite frustrating once more. I have little info concerning the contents of the Master, as little as just the names of the chapters and the name of the professors in some cases. And with some exceptions, so far the chapters have not been very useful to me while the workload is insane, and I am worried that the whole thing is going to be the same. I feel like I'm wasting my time, since I am above all a developer and I don't really need or want to write academical papers, or fund applications, or job offers (these are some of the activities that I have to deliver). I'm not saying that the Master is useless by itself, it's just not that useful for a person with my profile. So I am considering putting these studies in a second place, follow only those chapters that I consider useful and invest the rest of my time experimenting with new technologies. Learn by doing, that's the best way to go. The worst that could happen is not getting the Master certificate, which I don't care that much about. I believe that knowledge and experience are more valuable than a paper saying that I did this or that, as long as I can prove it somehow.

With these things in mind yesterday I sent an e-mail to my coordinator and I am now awaiting her response. I'm just hoping that she understands my point of view and won't take it in a bad way.

Today is a new day and I've been thinking on the next steps, I need an action plan.

Action Plan

  • Get to know the context
    • Read about what's out there in terms of software, devices and applications
    • Look for people and companies involved in the development of VR applications. Find out which are the desirable skills in a potential employee
  • Learn
    • Focus my efforts on learning the key skills to be hirable
    • Create demos for Android using AR. Maybe also for IOS.
    • Find out which applications/engines/frameworks are the most used in the creation of VR/AR applications (e.g. Unity, Unreal Engine) and create demos
    • Take whatever courses or workshops are available in relation to VR/AR
  • Create a portfolio
    • Create a website in which I can publish my demos (or use this blog)
  • Look for a job
    • Not any job, a job in the field :-)